
I found this neat lady-bug fabric on the 50% off rack at JoAnns. To top it off, I had a 50% off coupon for the 50% off fabric! Problem was, there was only a yard left on the bolt.
Well, maybe not so-much-of-a-problem -- this'll make a really neat one yard project! To make it even easier, the cuts are going to be very simple ... and there's only three of them!

So I'm thinking -- an apron. The fabric is bright, fun, and cheery! How about an end result that looks something like this?
It's got a drawstring tie around the waist -- and some large pockets for spoons, tools, and other important things (well okay, cookies and TV remotes, too).
What makes this apron so easy to make are the fabric cuts -- there are only four of them. Furthermore, the cuts are all straight across the grain of the fabric. If you don't feel like laying the fabric out and using your scissors, you can cut small notches in the right places and just tear the fabric pieces.

I had one yard of fabric that was 44 inches wide; I cut it into four pieces across the width (44 inches).
The first two pieces were each 2 inches by 44 inches. I have them folded in half in the picture -- so that it looks like two pieces that are 2 inches by 44 inches. These two pieces will be our drawstrings.
After cutting the first two pieces, we've used up 4 inches of our 36 inch yard of fabric.
The next piece will us up another 11 inches. Cut or tear a piece 11 inches tall across the 44 inch width of the fabric. That's the squarish looking block you see above underneath the two drawstring pieces. This will be the pocket on the bottom of the apron.
The remaining piece of fabric (all 21 inches of it) will be the body of the apron. So -- we have four pieces -- two pieces 2 inches by 44 inches, one piece 11 inches by 44 inches, and one piece that's 21 by 44 inches. 2 + 2 + 11 + 21 = 36 inches for our one yard of fabric project!

Let's begin sewing with the body of the apron -- since we cut across the width of the fabric, we may not need to finish the edges; they may be selvedge finished already. In this particular case, I had a problem -- my selvedge had small logo running down the side.
I could have left it alone -- the selvedge did provide a good finish to the sides -- but having a logo ranging along the border just bothered me. So -- I decided to "hem" the edge of the apron body to hide the logo.
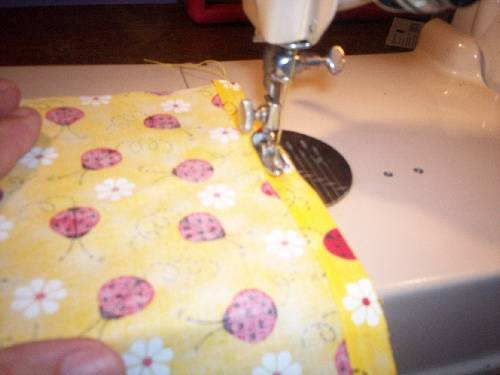
I didn't do anything special -- no serging or anything like that. Just ran a simple double-foldover hem up each side of the 21 inch by 44 inch apron body piece. The hems are on the selvedge edges -- so each hem is 21 inches long.
I folded about a half inch over, then folded another half inch over that to enclose it. Then ran a quick straight seam down the edge to close the foldover.
Nothing fancy, but the logo is now hidden and the edges are protected from fraying.
If you decide to fold-over finish the edges of your apron body, you'll want to do the same thing to the edges of your apron pocket (the 11 inch by 44 inch piece). Since the pocket will lay on top of the apron body, the widths should be the same. Go ahead and do the same double fold over seam to the edges of your pocket if you need to.

Check the pattern on your fabric to determine which way it "up"! In my case, I wanted most of the ladybugs facing towards the top of the apron. So, I turned the fabric so the ladybugs faced to the top, then I sewed another double foldover seam along this top.
In this case, the top seam will also be our drawstring casing -- so we want to make it wide enough to hold the drawstrings. I liked having a little "ruffle" along the top -- so I used about 2 1/2 inches for my foldover ... 1/2 for the first fold over (which I then sewed down), then 2 inches for the next fold over.
We're going to leave the opposite edge (the bottom) of the apron body unfinished for now. When we join the pocket to the bottom of the apron, we'll have a chance to finish it then.
 Thinking of the pocket -- that's the 11 inch by 44 inch piece -- let's go ahead and finish the top of this piece. Again, check the pattern of the piece -- you want the pattern on the pocket facing in the same direction as the pattern on the apron body!
Again, I did a small 1/2 inch fold over first, then a wider 2 inch or so fold over second. The second fold doesn't really need to be this wide -- but it seems to lay flatter if you do so.
Note how the edges of the pocket were already finished with the 1/2 inch double fold over we did earlier!
At this point, the bottom of the apron and the bottom of the pocket are still unfinished. We want to join the bottom of the pocket to the front of the apron along the bottom. You have a couple of options here.

I took the easy way out and just pinked the edges.
First, I joined the two unfinished edges of the apron body and pocket, good side (front of pattern) of pocket to bad side (rear of pattern) of apron.
I sewed a straight seam along the width of the join -- then I used my pinking shears to pink along this unfinished edge.
If you wanted to get a little fancier, you could try a French Seam instead.
One you've done, fold the pocket up along the seam so that the front sides of both pocket and apron are on the same side -- then, sew a simple straight seam along the edges of the pocket
 At this point, you have a very wide pocket! You may wish to sew some extra straight seams up the length of the pocket to subdivide it into smaller sections.
I broke mine into four sections -- two about 8 inches wide along the sides, and remaining two separated by a single seam in the middle of the pocket.
You can see how I tucked my pinking shears into one of the pockets to show you where they are.
We're done with the body of the apron -- time to finish up with the drawstrings. Remember those two 2 by 44 inch pieces? We're using them right now.

This part is simple -- doing one piece at a time, fold them in half width-wise to make a 1 inch by 44 inch piece (matching good side to good side)-- and then sew along the width of this piece. You'll have a long "tube" about 44 inches long. Go ahead and sew one of these ends closed -- but not both ends!
Do this to both drawstring pieces.
Now for the "fun" part (not really, I always hate this part). We need to turn these two drawstring pieces inside out. Use your favorite technique and curse words here.

I used a long, thin dowel that I had sitting around. There are other techniques that may work better -- and others that may work worse!
Once you've done this, you have two long, thin drawstring tubes about 44 inches long each.
Join these two pieces together to make a single piece 88 inches wide. You don't need to do anything fancy or pretty at the join -- the drawstrings will be inside the apron casing and non one will be able to see the join. Just make it strong.

It's my favorite because it's simple and it always works.
Find a decent-sized safety pin -- you don't want a small one that you can't feel -- and pin it to one end of your drawstring. Next, stick the safety pin end inside the apron casing and work the safety pin through the casing. It's big and stiff enough that you can feed it through with you fingers -- and it will pull the drawstring along through as it feeds.

The casing will bunch up as you pull the drawstring through -- this is good because I want the top to look a little "ruffly".
Be careful as you pull the drawstring through that you don't pull the other end into the apron casing. Since that end won't have a safety pin attached, you'll find it very difficult to pull back out.
Because of this, once you get the drawstring through, you might want to even out the two ends of the drawstring and take a quick stitch through the middle of the casing -- this will "lock" the drawstrings in place so they can't accidentally get pulled out.

To tell you the truth, even though the apron looks and works great, I don't use it that much -- as an apron. I use it as a decoration instead!
I've made several aprons using this technique and have them arranged in the kitchen as decorations. Some are just for bright and cheery colors -- and others I've made with "holiday" fabric (Christmas, Halloween, Thanksgiving, etc). If you plan ahead, you can pick up a few yards when the holiday goes "out of season" for next to nothing -- and have some unique and useful decorations when the season rolls around again!
This is adorable! Will be making for my DIL soon!
ReplyDelete