Saturday, June 23, 2012

Battery Bandolier


My three year old grand-daughter loves her battery powered games and toys.  Unfortunately, she's not too great at keeping track of her spare batteries.  They fall out of the packaging and get scattered and lost.  Then she comes to grandpa -- and all my batteries are scattered and lost, too!

So -- I decided to make her a battery bandolier (think Rambo strapped with belts of batteries rather than bullets).  I decided I'd use elastic rather than making cloth pockets -- the elastic will keep the batteries from falling out.


I figured this would be a good one-yard project.  I'm going to use three fabric pieces -- a front, a back, and a canvas interfacing for stiffness.  I'm also going to use a 1-inch wide piece of elastic (length depends on number of batteries you store) as well as two 3" metal hoops ... since I want to hang this on a doorknob.

I wasn't going to buy any fabric -- I was just digging scraps from the scraps bin.  But, when I went to Hobby Lobby to pick up the metal hoops, I saw some bandannas sitting in a bin -- 99 cents each and I figure I can use these as well!  Didn't use them for this one -- but will for the next one (I've got grand-sons, too!)


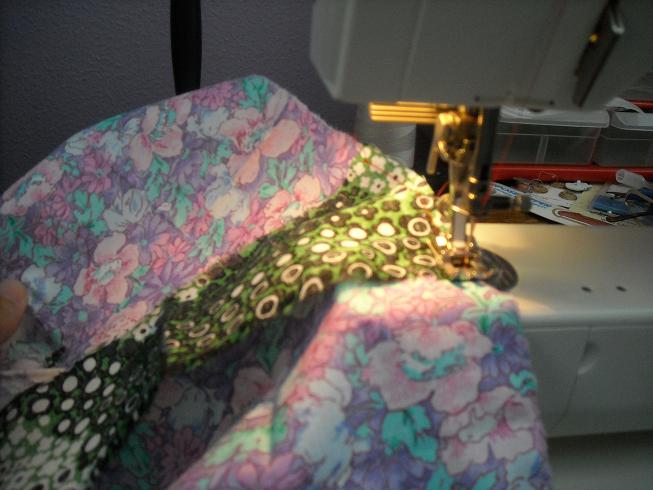
I'll start with the first two pieces -- I'll measure a 3 1/2 wide strip of my "inside" piece (the purple piece above).  Not too sure how long to make it, so I'll just cut it 18" long.  I'll then cut a piece of my dark blue canvas (more scraps) the same size.


Next, I'll just sew the two pieces together.  I'm using about a 1/2" seam allowance.  Don't worry about finishing hems -- this will all be enclosed before we finish.

Be sure and match wrong-sides if your front piece has a pattern.  You want the good side showing.  The canvas backing doesn't matter because it'll be completely enclosed.

Sew along all four edges.


Once you've sewn the inside and canvas pieces together, you'll want to attach your 1" wide elastic to the "front".

I'm using it to hold AA size batteries -- it looks like it'll take about 1 1/4" of elastic for each battery.  I want to use at least 12 batteries -- so that's 12 times 1 1/4" ... or about 15 inches.  I cut an 18" piece of elastic just to make sure.


Next, I joined the elastic to the front.  I wanted the attachment to be very strong, so I began by sewing one straight seam with the elastic hanging off the side.

I began about an inch and a half from the end of my front strip and positioned the elastic in the center of the 3 1/2" width.  I sewed a straight seam to attach the elastic -- with the length of the elastic going off one side of the front.


I then folded the elastic back over the front side ... and sewed another straight seam.  This doubling should give this seam a lot of strength -- considering that little determined fingers will likely be tugging on it!


Now that the elastic is attached, I want to mark where I want to sew.  I've already determined from a scrap strip that it takes about 1 1/4" of elastic per battery (don't want it too tight, but don' want batteries to slip out too easily).  Each battery slot looks like it'll take about 3/4" of space.  So -- I drew a series of lines across my elastic ... 1 1/4" inches apart.  I then drew a series of lines on my fabric -- each about 3/4" inch apart.  Finally, I drew a straight line down the inside fabric -- so I wouldn't "wander" when attaching the elastic.


Time to start with the slots -- I sewed the first two and then checked the fit.

Note how the elastic bends outwards, but the canvas-backed fabric strip stays stiff and straight!  This is exactly how I wanted it to work.


Checking for fit -- okay, it looks like the batteries are snug enough to stay put, but loose enough so that it's not hard to "load" the batteries.

Time to continue sewing battery slots...


... take your time and stop every now and then to check for fit.  Make sure your elastic doesn't wander -- keep it aligned with your straight line.


Count the number of slots as you sew -- I wanted to use 12 slots.  When I got to 12, I still had some elastic left.  I also had a lot of fabric left ... since I had cut extra because I wasn't sure how long a piece I needed.

"Stop" the end of the elastic and double sew it.  I sewed it once, then clipped the elastic, folded it under, and sewed it again for the doubling.


I also "trimmed" the extra off my fabric piece.  I cut about two inches from the end of the elastic, then sewed a straight seam 1/2 inch from the edge. (so now my top and bottom match).


A final fit test -- load up all the slots and see if any of the batteries are too loose.  Shake the bandolier -- remember, a three-year old will be tugging on this!

I found one slot that was a little loose.  It's the one with the copper-top facing the opposite direction.  I need to "tighten" it up a bit.


I'll remove the batteries, then sew another straight seam about an 1/8 inch from the original.


This will make this one slot fit a little tighter than it did originally, but won't affect the other slots at all.


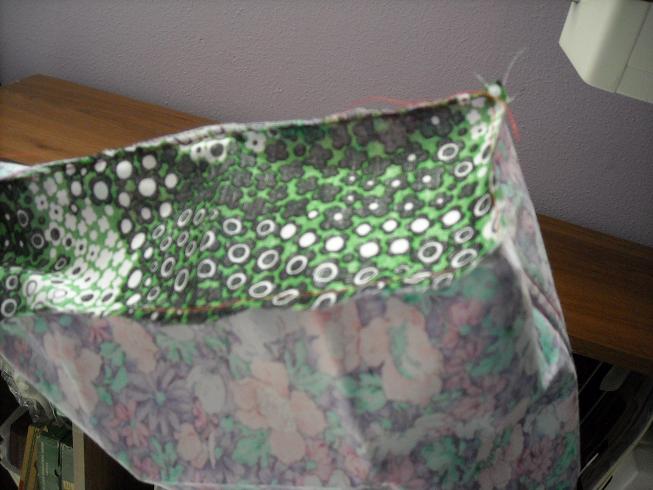
Now for the outside cover.  I found some "monkey" pattern fabric in my scraps pile.  My bandolier portion is about 11 inches long and 3 1/2 inches wide.  I want about 1 1/4" inch on each side of my width and 6 inches on each end of my length -- so I cut a monkey piece about 6 inches wide by 23 inches long.


Sew about a 1/2 fold-over on all four edges of this piece.  You want your bandolier piece to fit just inside the raw edges of the outer hem.

I'm positioning my piece I trimmed off earlier to check them hem on the outside cover.


Now, place your bandolier piece on the inside of your outside cover.  Center it, then fold over the outside ends about 3 inches to just cover the edge of your bandolier.

You can pin the bandolier in place if you'd like.


Now, let's attach the first metal hoop.  Open the fold-over at one end and insert the hoop.


Now, fold the hem over, then fold the entire fold over again.  Position it so that it covers one raw edge of your bandolier (including the straight seam edge).

Note how the outer "monkey" piece is wider than the bandolier.  We're going to fold over these edges to cover the raw edges of the bandolier.

First, sew along the 3 1/2 inch side to lock that folded edge in place.

Next, fold the edges of the outside cover over.  Make sure the folded edge covers the edge of the folded end containing the hoop.

Once you've done this, fold over the outside piece and sew it in place.  When you get to the bottom, leave a gap of about an inch -- we'll use this to insert the folded opposite edge underneath the folded edges.

Sounds screwy, but it looks like this:


Then, the edge trickeration:

Fold the opposite end over (BUT BE SURE AND INSERT THE SECOND METAL HOOP FIRST!).

Work it so that the edge slips underneath that inch gap you left when you were sewing along the long side.


Sew along the folded over opposite edge to get to the other long side of the bandolier ...

Then leave the needle down, raise the foot, rotate the work 90 degrees, lower the foot, then fold over and sew along the other side of the bandolier.

You're enclosing all the raw edges you left when you built the pocket-side of the bandolier.


And -- you're done!

Hoops on both ends -- check!

12 battery slots -- check!  You can just extend the piece and sew additional slots if you'd like.  I was concerned that more than 12 batteries might be too heavy -- but it wasn't.  My next one will have 16 batteries.


You can "close it up" to hang it over a doorknob ...


Or leave it open to expose the batteries!


Sunday, June 10, 2012

Scented Hot Pad


Here's a really simple one -- a hot pad scented with your favorite potpourri!  Use it for hot pots, teapots, etc.  Note:  Don't put it in the microwave to heat it up ... I tried that and burned a hole when the potpourri heated up a little too much!

Adjust the size to fit your needs -- I made this one about 6 inches by 6 inches square.


I began with two colorful cotton pieces for the front and back ... as well as two pieces of cotton batting about the same size.  What we'll do is make two bags -- one of cotton batting that we'll fill with potpourri, and a second made of the colorful front/back.  We'll stick the batting bag inside the colorful bag to make our hot pad.

You'd just as soon be generous with seam allowances -- all the edges will be enclosed, so why not make the sewing easy!  For my 6 inch square pad, I used pieces about 7 1/2 inches on a side.


Begin by sewing a square bag from your batting.  Sew along three sides, then invert the bag.


Fill this bag with some of your favorite potpourri.  Smaller pieces of potpourri work better than larger pieces.  I made one bag that had potpourri made with curls of wood shavings and little pine cones.  It worked okay, but was really lumpy.  I made another one that I filled with bags of herbal tea (I emptied the tea bags into the larger cotton batting bag.  I thought it was a good idea, but didn't work all that well (not enough padding).  Try to fill the cotton batting bag so that it's at least 1/3 inch thick.


Now, sew along the fourth side of the batting bag to close it.  No need to slipstitch it -- we're going to completely enclose this bag, so it's okay if this fourth edge is unfinished.


Next, join the right sides of your two outer pieces.  Sew along three sides to make another bag.

Note how I used about a 1/2 seam allowance.
Invert this outer bag so that the right sides are now on the outside.


Insert the cotton batting bag into this colorful outer bag.  Tuck in the open fourth side, then slipstitch it closed.


And ... you're finished!

BTW -- this bag is the one that had the potpourri with wood curls and pine cones.  You can see how lumpy it is!   I ended out shoving down on it really hard with weights to smush (is that a word?) the potpourri a little flatter.  Worked better after that.


Be sure and use front/back pieces of different colors -- that way you can flip the pad depending on your mood, your decorating scheme, or your teapot!

Sunday, June 3, 2012

Lunchtime "Paper Bag" from Fat Quarters


I travel around a lot for work -- which means I seldom get to bring my lunch to work.  Most of the time, I'd rather have a cheese sandwich from home than whatever I have to grab at a company cafeteria.

For those times when I can bring a sandwich, I normally carry a little brown paper bag.  This got me thinking -- instead of a tossable paper bag, why not make a washable cloth "paper bag like" bag?

The plan -- use some fat quarters that I had lying around.  Each quarter is one-fourth of a yard of fabric -- 18 inches by 22 inches.  Here's what I wanted to make.

No fancy plans -- just follow what a paper bag looks like ... just make it from fabric instead!

Even though a single fat quarter is plenty for the bag, I decided to use two pieces -- this lets me have different colors for the front/back and the two sides.  I decided to use French Seams to finish the edges -- but I thought I'd put the bound edge on the outside, rather than the inside.  Thought it might give it a slightly different look.

So -- I grabbed two fat quarter pieces in contrasting colors.  I originally bought these at a 99 cent special -- but two pieces have plenty of fabric to make at least three or maybe four bags.


I wanted to keep the proportions about the same as a small lunch-size paper bag.  I figured the width of the front to be about six inches -- and the width of the sides around 4 inches.  I didn't do any fancy measuring, just eyeballed things until they looked right.

I began with the front/back piece -- I wanted two pieces about 18 inches by 6 inches.  So, I measured off about six inches, made a slight cut, then tore the fabric across for my first piece.  I then did the same thing to cut by second piece.


These two pieces will be my front and back sides of the "paper bag".  I'm going to join them together to make a single 36 inch by 6 inch piece.  I didn't want a pokey seam at the join -- wanted something flatter -- so I used a flat-fell seam to join the pieces.

You can see my two pieces aren't the same width -- that's what happens when you eyeball instead of measuring!  No problem, I'll just trim the extra wide piece so that both pieces match.


After trimming, I folded the piece in half with the flat-fell seam at the fold.  This fold will end out being the middle of the bottom part of the bag.

If I made the bag with this piece as-is, I'd have a really, really TALL bag!


I want to keep the proportions similar to a folded brown paper bag (hey, it's a proven design), so the next step is to trim the piece a little smaller.

Again using the "eyeball" method, I cut about three inches off the "top".


Time for the contrasting color sides.  My plan is to have the flat bottom of the bag be the fold of the front/back piece.

I want the bag to be about four inches wide on the side.

So, I lined up my contrasting fabric at the "top" of my bag and cut an 8 inch wide piece that ended about 2 inches from the bottom seam of the bag.


I then cut this side piece in half, giving me two pieces each about 4 inches wide and about two inches shorter than half the front/back piece.


Now, the "tricky" part.

Normally when you do French Seams, you begin with wrong sides matched.  Since I want the seam on the outside of the bag, we're going to begin with good sides matched.

Open up the front/back piece and lay it so the good side is facing up.  Line up the good side of a side piece so that the middle hits the flat-fell seam of the front/back piece.  The two pieces will make sort of a "T" shape.  Line up and pin the edges.

Time to start sewing.  Begin at one edge of the side piece.  Using a 1/4" seam allowance, sew along the base of the side piece.

When you get to the edge, lower your needle to make a "pivot" point.

Now, raise your presser foot. Drag the side piece along so that the side matches up with the side of the front/back piece (The side piece used to point to 9 o'clock; make it point to 6 o'clock)


Position the "side" of the front/back piece so that it matches up with the edge of your side piece.  Lower the presser foot and resume sewing!

You'll want to be careful you don't bunch up some of the front piece when you do this.

Sew along to the end of the side piece.

When you get there, reposition the piece so that you can sew up the other side of the side piece.


Here's what it looks like when you're done.

You know what comes next -- let's do the same thing with the other side piece.

About the only thing you can have go wrong here is to bunch up the fabric when you make the 90 degree turns at the bottom of the piece.


Try to keep about a 1/4 inch seam allowance as you sew.

When you're finished with both sides, you'll have a "lunchbag shaped" bag.  The edges will be raggedy ... but we're going to take care of that right now.

First, trim your seam allowance to about 1/8 inch.

Next, invert the bag -- turn it "right-side out".  After you do, the good  sides of the fabric will now be on the outside.

Here's where your personal preferences come into play.  You see how the seams are a little "poofy" right now.  We want them flat before we continue with the French Seam.


If you want perfect French Seams, you'll want to iron these seams flat so that the fold exactly at the edges.

If you're happy with okay French Seams, though (like me), then you can put your finger inside the bag, push along the edges of the seam, and "pinch" the edges flat.


Whichever method you use, the next step is to sew a straight seam along the edges.  Remember, we've got a 1/8 inch raw seam on the inside.  When you sew, use about a 1/4 inch seam allowance again.  This will end up enclosing that raw seam that's on the inside!


Continue along all the edge sides where the two contrasting pieces of fabric meet.  French seams always look a little like "piping" to me.  Normally, you have the enclosed piece on the inside of your piece.  In this case, I've arranged it so that the enclosed "piping-like" piece is on the outside.  No special reason, I just thought it might look neat.


When the French Seam is complete, you're almost done.  We just need to finish the seam along the opening of the bag -- and also add some velcro.


The top of the pieces at the opening of the bag are still raw -- I just inverted the bag and did a simple double fold-over hem along the top

You may have to trim the top edges to make them match before you begin the hem.


When done, invert the bag again.  We now need to attach some velcro.  Since I want to mimic a paper bag -- and since a paper bag will hold a fold where fabric won't -- we need a little help to keep the fold in place.

Velcro will do the trick!  I used a plain-old sticky velcro square.


I folded over the top of the bag once, then positioned a sticky velcro tab in the middle of the fold.  I then placed the matching velcro piece on top, then folded the top over once more.  This gives me a "double-fold" at the top that will remain in place.

After you fold the piece over, push down on it for a moment so the sticky velcro attaches fully.


After it's attached, you can unfold the top to see how the two velcro pieces line up.


And that's it -you're finished.  My bag had plenty of room for a sandwich, a bag of chips, and a small pack of cookies.  If you normally carry more booty for lunch, you might want to alter your bag dimensions to make it a little bigger.

For me, this "mock paper bag" works just right!  If you figure two fat quarters will yield three or four bags, then a full yard (four quarters) will easily give you enough for a week's worth of washable lunch bags!